Flash on rubber parts, also known as flashing, is a common molding defect. This flash can range from minor to barely noticeable. Addressing flash on rubber parts is crucial, excessive flash can influence the aesthetic quality and functionality of the final product. In this post, we will introduce the causes of flash on rubber parts and learn how to prevent and eliminate flash on rubber parts.
What is Flash on Rubber Parts?
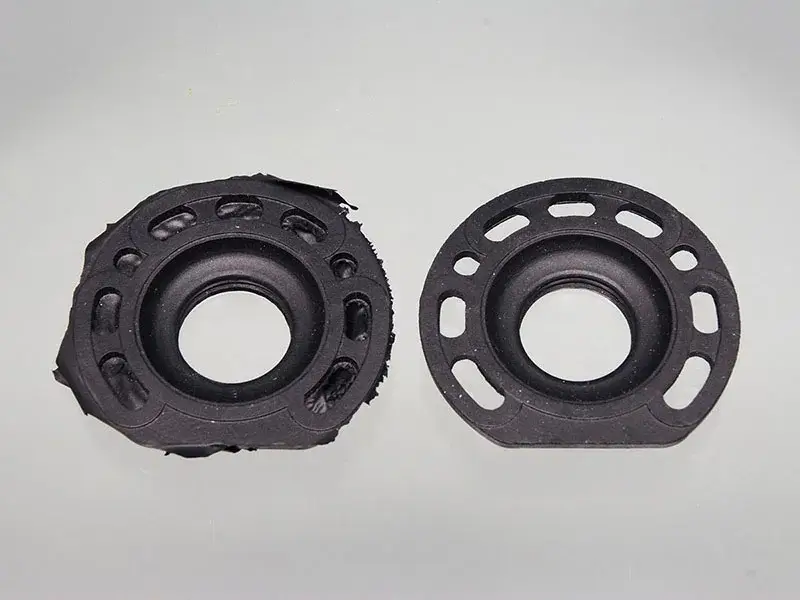
Flash on rubber product is the excess rubber material that leaks out of the mold cavity and solidifies along the parting line of the mold. This thin layer of excess material forms when the mold halves do not fit together perfectly or when there is excessive material or pressure during the molding process. Flash can appear on the edges of the part where the mold separates and can vary in thickness and extent.
The flash looks like a thin, extraneous layer of rubber extending from the parting line of the molded part. It can be as thin as a hairline or more pronounced, depending on the severity of the molding issue. In severe cases, the flash can be several millimeters thick and may require manual trimming or deflashing to remove.
Causes of Flash on Rubber Parts
Mold Design Issues
Poorly Designed Parting Lines: The parting line is the interface where the two halves of the mold meet. If the parting line is not designed correctly, it can create gaps or mismatches that allow the rubber to escape and form a flash. The parting line should be strategically placed to minimize the likelihood of flash and ensure ease of removal if it does occur.
Inadequate Clamping Force: Clamping force is the pressure applied to keep the mold halves tightly closed during the molding process. Insufficient clamping force can result in gaps between the mold halves, leading to the formation of flash. Ensuring proper clamping force is crucial to maintaining a tight seal and preventing material leakage.
Improper Venting: inadequate venting can lead to flash, possibly resulting from vents not being deep enough for stiff materials, vents not being thin enough for fluid materials, or old and worn vents that no longer meet required tolerances.
Worn Tooling: Old or worn mold components that no longer maintain tight tolerances can lead to the formation of flash.
Material Issues
Incorrect Material Viscosity: Viscosity refers to the thickness or flowability of the rubber material. If the material viscosity is too low, it can flow more easily into gaps and crevices in the mold, leading to flash. Using rubber with the appropriate viscosity for the specific molding process helps reduce the risk of flash.
Inconsistent Material Properties: Variations in the rubber material properties, such as density or elasticity, can cause uneven flow and curing, contributing to flash formation. Ensuring consistent material quality and characteristics is essential for producing flash-free rubber parts.
Process Parameters
Excessive Injection Pressure: High injection pressure can force rubber material into unintended areas of the mold, causing flash. Optimizing the injection pressure to the minimum required level helps control material flow and reduce flash.
Improper Mold Temperature: Mold temperature affects the flow and curing of the rubber material. If the mold is too hot or cold, it can lead to improper curing and material flow, resulting in flash. Maintaining the correct mold temperature is crucial for achieving uniform and flash-free parts.
Inadequate Curing Time: Curing time is the duration required for the rubber material to harden and take the desired shape fully. Insufficient curing time can result in incomplete curing, causing the material to remain tacky and prone to forming a flash. Ensuring adequate curing time allows the material to be set properly and reduces the risk of flash.
By addressing these causes through careful mold design, appropriate material selection, and optimized process parameters, manufacturers can minimize the occurrence of flash on rubber parts and enhance overall product quality.
How to Avoid Flash on Rubber Parts?
Optimize Parting Line Locations
Carefully plan and design the parting line location to minimize the chances of flash formation. The parting line should be positioned to reduce gaps and mismatches, and placed in areas where flash is less likely to interfere with the part’s functionality or aesthetics.
Ensure Proper Clamping Force and Mold Alignment
Insufficient clamping force is one of the most common causes of flash on rubber parts. Molds are kept closed during the injection process by clamping forces, usually applied through hydraulic or mechanical systems. These forces must effectively counteract the pressure exerted by the injected material. When the clamping force is too weak, the mold may slightly separate, creating gaps through which material can seep, resulting in flash formation. Generally, high-viscosity materials and thin-walled parts require greater clamping forces.
Use Materials with Appropriate Viscosity
Select rubber materials with the right viscosity for the specific molding process. Materials that are too fluid can easily seep into gaps and crevices, causing flash. Choosing materials with suitable viscosity helps control the flow and reduce flash.
Ensure Consistent Material Quality
Maintain uniform material properties, such as density and elasticity, to prevent uneven flow and curing. Consistent material quality ensures predictable behavior during molding and reduces the risk of flash.
Adjust Injection Pressure and Mold Temperature
Optimize injection pressure to the minimum level required to fill the mold without forcing material into unintended areas. Similarly, maintain the correct mold temperature to ensure proper flow and curing of the rubber. Both parameters should be finely tuned to minimize flash.
Ensure Adequate Curing Time
Allow sufficient curing time for the rubber material to harden and take the desired shape fully. Inadequate curing can leave the material tacky and prone to forming a flash. Ensuring the right curing time helps achieve fully cured, flash-free parts.
Clean and Inspect Molds Regularly
Perform routine cleaning and inspections of the molds to remove any debris, residue, or buildup that could affect mold performance. Regular maintenance ensures that molds remain in good condition and reduce the chances of flash.
Repair or Replace Worn-Out Mold Components
Identify and address worn or damaged mold components promptly. Worn-out parts can lead to poor mold alignment and gaps, causing flash. Replacing or repairing these components as needed helps maintain the mold’s integrity and performance.
Deflashing Techniques for Rubber Parts
Deflashing is a crucial process in rubber manufacturing to remove excess material, known as flash, from molded rubber parts. Various techniques are employed to achieve this, each with its advantages and applications. Here are some common deflashing methods.
1. Manual Deflashing
Manual deflashing involves using hand tools such as scissors, knives, or grinding equipment to trim excess rubber. This method is labor-intensive and can lead to inconsistent results due to human error and variability.
2. Cryogenic Deflashing
Cryogenic deflashing uses liquid nitrogen to freeze the rubber parts, making the flash brittle and easy to remove. The parts are then blasted with non-abrasive media, such as polycarbonate or plastic pellets, to remove the flash without damaging the part’s surface. This method is highly efficient, consistent, and suitable for complex geometries and high volumes.
3. Mechanical Deflashing
Mechanical deflashing involves using machines such as centrifugal barrel finishing machines. Parts are combined with media, water, and soap, and processed at set times and speeds. This method is fast and cost-effective, particularly for large batches of parts.
4. Chemical Deflashing
Chemical deflashing uses chemicals to dissolve or soften the flash, which is then washed away. This method can be effective but raises environmental and safety concerns due to the use of hazardous chemicals.
Conclusion
Flash on rubber parts are a common issue that can affect both the aesthetics and functionality of the final product. Mold design issues, material inconsistencies, and process parameters improper will cause flash. Manufacturers can take proactive steps to prevent or take different deflashing techniques for rubber parts.


