The rubber compression molding process is one of the rubber molding manufacturing processes for shaping rubber into custom products. In this post, we will explore the rubber compression molding process steps, commonly used materials, compression mold types, and pros and cons. By the end, you will have a clear understanding of this manufacturing process.
What is the Rubber Compression Molding Process?
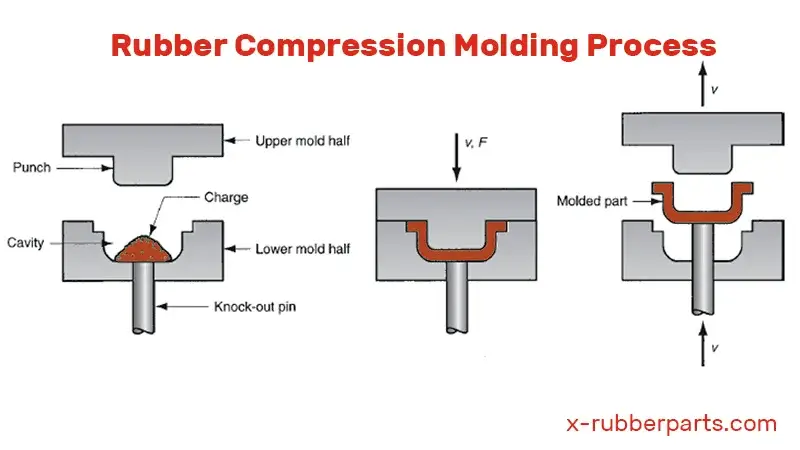
The rubber compression molding process is a manufacturing process used to shape rubber materials by placing a pre-measured amount of uncured rubber into a heated mold cavity. The mold is then closed, applying pressure and heat to the rubber. This causes the rubber to flow and fill the mold cavity, curing it into the desired shape. The process is straightforward, cost-effective, and suitable for producing both large and intricate parts.
Comparison with Other Rubber Molding Processes
Injection Molding: Involves injecting molten rubber into a mold cavity under high pressure. This process is faster and more suitable for high-volume production compared to compression molding, but it requires more complex machinery and higher upfront costs.
Transfer Molding: It combines aspects of compression molding and injection molding. A preformed, uncured rubber slug or preform is placed into a pot or chamber at the top of the heated mold and a plunger or ram applies pressure to force the uncured rubber through sprues or runners into the mold cavities below. It also involves more complex equipment and higher costs than compression molding.
What are Common Materials Used in the Rubber Compression Molding Process?
The common materials used in the rubber compression molding process include:
Natural Rubber: Derived from rubber trees, natural rubber is commonly used for compression molding due to its good elasticity, abrasion resistance, and ability to withstand moderate temperatures. However, it can be prone to degradation by heat, light, and ozone.
EPDM (Ethylene Propylene Diene Monomer): A synthetic rubber with excellent resistance to heat, ozone, and weathering. EPDM is widely used for compression molding automotive seals, gaskets, and hoses.
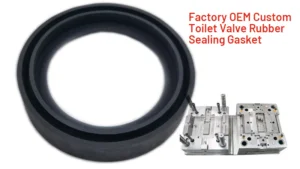
Silicone Rubber: With its high-temperature resistance, flexibility over a wide range, biocompatibility, and electrical insulation properties, silicone rubber is commonly compression molded into gaskets, seals, medical devices, and food-grade products.
Nitrile (NBR): Known for its excellent resistance to oils, fuels, and chemicals, nitrile rubber is suitable for compression molding seals, gaskets, and other automotive parts.
Neoprene (Polychloroprene): A synthetic rubber with good chemical, oil, and weathering resistance. Neoprene is used for compression molding gaskets, seals, and other industrial rubber goods.
SBR (Styrene-Butadiene Rubber): Offers good abrasion resistance and aging stability, often used in tires and footwear.
Butyl Rubber: Offering excellent air impermeability, butyl rubber is compression molded into inner tubes, tire curing bladders, and seals.
Viton (Fluoroelastomer): With its superior resistance to high temperatures, chemicals, and harsh environments, Viton rubber is compression molded for seals in automotive and aerospace applications.
The choice of material depends on the specific requirements of the application, such as temperature resistance, chemical resistance, flexibility, and cost considerations. The material manufacturers can also blend different elastomers or add fillers to enhance certain properties of the compression-molded rubber parts.
What are the Processes of Rubber Compression Molding?
The Rubber Compression Molding Process Steps
1. Preparing the Mold
The mold is designed based on the desired shape and specifications of the final product. It is typically made from durable materials like steel or aluminum to withstand repeated use and high pressures. Then the mold is thoroughly cleaned to remove any residues and preheated the compression mold to the required temperature.
2. Preparing the Rubber Compound
The raw rubber is mixed with additives such as vulcanizing agents, fillers, and stabilizers to achieve the desired properties. And forming it into a preform or slug of the required shape and size for the mold cavity.
3. Loading the Mold
The rubber preform is placed into the heated mold cavity. Accurate placement is crucial to ensure the material fills the mold correctly. Then close the mold and apply high compressive force to force the rubber to flow and completely fill the mold cavity.
4. Curing the Rubber
The mold, along with the rubber, is heated to a specific temperature to initiate the curing (vulcanization) process. This process cross-links the rubber molecules, giving the material its final properties. The mold is kept closed under heat and pressure for a specific period, known as the curing time, to ensure the rubber cures uniformly and completely.
5. Demolding
Opening the mold and ejecting the molded rubber part.
6. Post-molding
Any excess rubber, known as flash, is trimmed off, and the part may undergo additional finishing processes like inspection, post-curing etc. to meet the required specifications.
Types of Rubber Compression Molds
Rubber compression molding utilizes various types of molds to achieve specific characteristics in the final product. Here are the primary types of rubber compression molds:
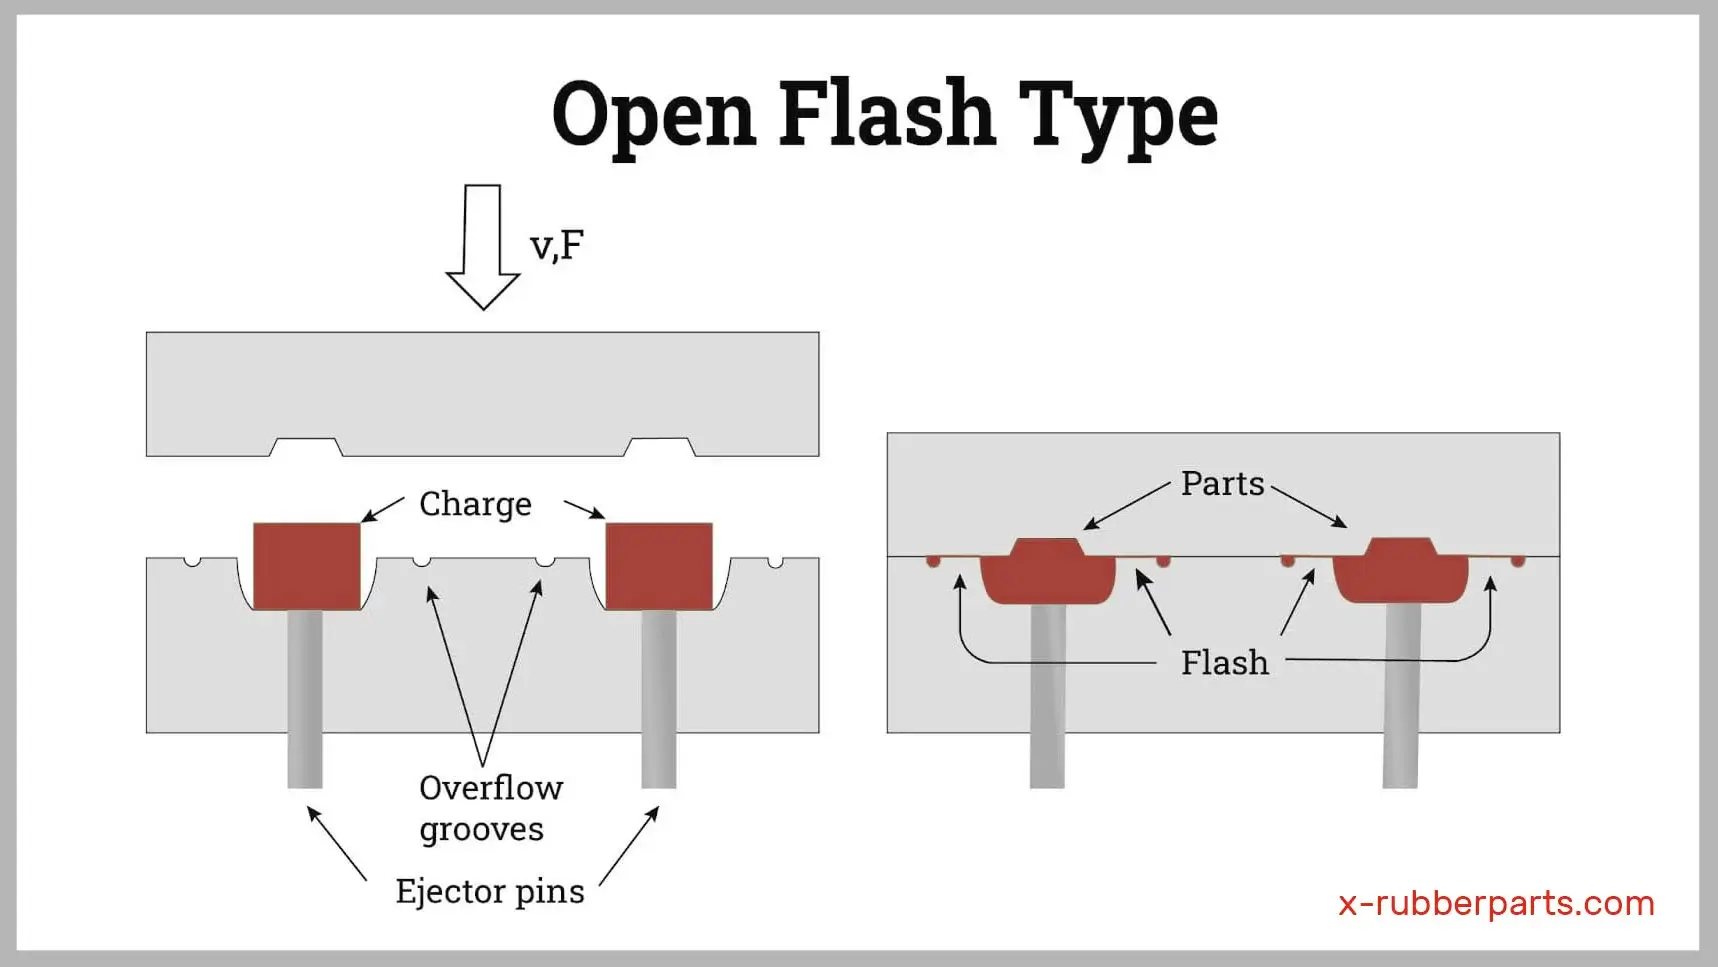
Open Flash Type Molds
These are the most common and simplest types of compression molds. They consist of a cavity and a core with no provision for trapping the excess rubber that flows out during molding. This excess rubber, known as flash, has to be trimmed off after molding.
Advantages: Simple and cost-effective design, easy to manufacture and maintain.
Disadvantages: Requires additional trimming of flash after molding, which can increase labor and production time.
Applications: Suitable for less critical parts where minor imperfections are acceptable and where cost is a primary concern.
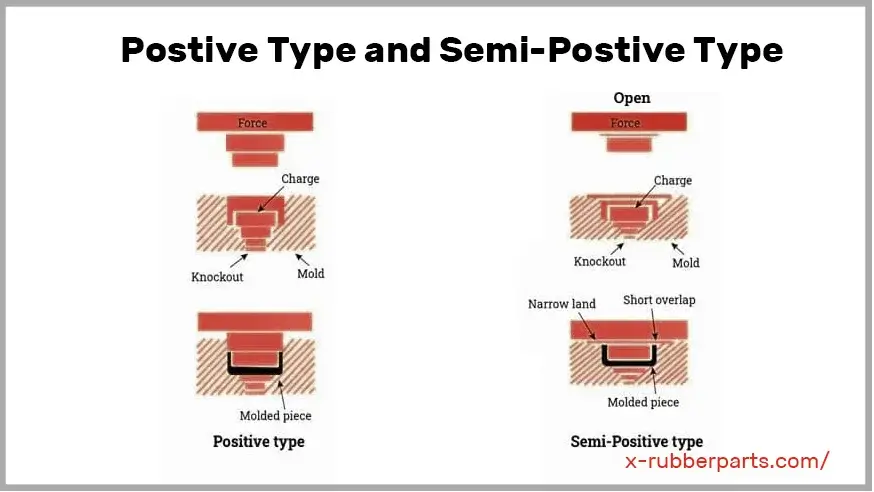
Positive Type Molds
In positive molds, the mold cavity is designed to be slightly smaller than the desired final part dimensions. This mold type uses a plunger to force the rubber into the mold cavity. The plunger precisely controls the amount of rubber, minimizing or eliminating flash.
Advantages: Produces cleaner parts with minimal flash, reducing the need for post-molding trimming.
Disadvantages: More complex and expensive to manufacture than open flash molds. Requires precise control of rubber preform size and placement.
Applications: Ideal for high-precision parts where dimensional accuracy and surface finish are critical, such as medical devices and high-performance seals.
Semi-Positive Type
A hybrid between open flash and positive molds, this design features a slightly oversized mold cavity that allows a small amount of flash to form. The plunger does not fully enter the cavity, leaving a thin flash layer.
Advantages: Balances the ease of molding with reduced flash. It requires less trimming than open flash molds and is less complex than positive molds.
Disadvantages: Some flash still require trimming, and precise control is necessary to ensure consistent part quality.
Applications: Suitable for parts that require a good balance of dimensional accuracy and cost-effectiveness, often used in automotive and industrial applications.
Advantages of the Rubber Compression Molding Process
Rubber compression molding offers several distinct advantages, making it a popular choice for manufacturing rubber parts across various industries. Here are some key benefits:
1. Lower Initial Costs:
The molds used in compression molding are simpler and less expensive to manufacture compared to those used in injection molding and transfer molding.
2. Economical for Small to Medium Production Runs:
Ideal for producing smaller quantities of parts without the need for significant investment in complex machinery.
3. Lower equipment costs:
Compression molding machines are generally less expensive than injection molding equipment.
4. Versatility in materials:
The rubber compression molding process can mold a wide range of elastomeric materials like natural rubber, EPDM, nitrile, silicone, etc. Accepts stiff, high-durometer rubber compounds.
5. Ability to incorporate inserts:
Inserts like metal components can be easily incorporated into the molded part.
6. Suitable for large, thick-walled parts:
Can produce large, thick rubber parts without limitations on part size or weight. Excellent for molding parts that require extended curing times.
Limitations of the Rubber Compression Molding Process
1. Not suitable for complex part geometries:
The limited flow of material within the mold cavity makes it difficult to eliminate voids, air traps, and knit lines when molding complex geometries.
2. Longer cycle times:
The compression molding cycle is typically longer compared to processes like transfer or injection molding. Processing certain rubber parts may take longer cure times, especially for thick sections.
3. Post-molding operations required:
Compression-molded parts often require deflating, trimming, and other finishing operations due to parting line flash formation. The flash must be mechanically removed, adding labor costs and the potential for part damage.
4. Not ideal for high production volumes:
For high-volume production of complex rubber parts, processes like injection molding are generally more efficient and cost-effective.
What is the Rubber Compression Molding Cycle Time?
Rubber compression molding cycle time refers to the duration of the entire molding process, from loading the uncured rubber preform into the mold cavity to ejecting the finished, cured part. The typical cycle time can range from a few minutes to over an hour.
The key stages that contribute to the overall cycle time are:
Mold Closing and Compression
Loading the uncured rubber preform into the heated mold cavity. Closing the mold under high pressure to compress and shape the rubber
Curing
Allowing sufficient time for the rubber to cure and vulcanize under heat and pressure. Cure times can range from 1 minute for thin parts to over 1 hour for very thick parts
Cooling and Ejection
Cooling the mold and part before ejection. Then eject the cured rubber part.
For example, a typical compression molding cycle for molding silicone rubber gaskets may take 3-6 minutes. 1-2 minutes for compression, 1-3 minutes for curing, and 1 minute for cooling and ejection.
How to Reduce Rubber Compression Molding Cycle Time?
Reducing the cycle time in the rubber compression molding process will improve productivity. Here are several strategies to achieve faster cycle times:
Increase the rubber compound temperature before molding:
Preheating the rubber compound to a higher temperature before loading it into the mold cavity can reduce its viscosity, allowing faster flow and filling of the mold cavity. This can be achieved by increasing the temperature of the extruder or preheating chamber where the rubber slug is prepared.
However, care must be taken not to overheat and degrade the rubber compound.
Optimize mold temperature:
Running the mold at the optimal temperature can speed up the curing/vulcanization process inside the mold cavity. The mold temperature should be set based on the specific rubber compound formulation and part geometry.
Incorporate cure accelerators:
Adding appropriate cure accelerators or catalysts to the rubber compound formulation can speed up the curing/vulcanization reaction and reduce cycle time.
However, excessive accelerators can negatively impact rubber properties.
The Rubber Compression Molding Process Applications
Rubber compression molding is cost-effective for low to medium production volumes and ability to mold large, thick-walled parts. They are suitable for diverse applications across industries where rubber components are required for sealing, insulation, vibration damping, and impact protection.
Some key applications of the rubber compression molding process include:
Automotive Industry
- Seals and gaskets (door seals, window seals, etc.)
- Grommets and bushings
- Vibration isolators and mounts
- Weatherstrips and trim components
Industrial Equipment
- Shock and vibration absorbers
- Sealing components (O-rings, gaskets)
- Rollers and wheels
- Bumpers and cushions
Aerospace and Military
- Seals for aircraft and spacecraft components
- Vibration isolators and dampers
- Fuel tank bladders and diaphragms
Construction and Infrastructure
- Expansion joints and bearing pads
- Sealing gaskets and washers
- Rubber pads and mounts
Electrical and Electronics
- Insulating components and bushings
- Cable jackets and grommets
- Seals for electrical enclosures
Medical and Healthcare
- Seals for medical devices and equipment
- Stoppers and closures for pharmaceutical vials
- Gaskets and diaphragms for medical pumps
Consumer Products
- Rubber grips and handles
- Seals for appliances and plumbing fixtures
- Rubber feet and bumpers for furniture
Conclusion
The rubber compression molding process offers a versatile and efficient means of manufacturing high-quality rubber parts for a wide range of industries. Especially for the diverse applications across industries where rubber components are required for sealing, insulation, vibration damping, and impact protection. While it has limitations in terms of producing complex geometries and longer cycle times compared to processes like injection molding, compression molding offers several advantages that make it a preferred choice for low to medium-production volumes.
As an experienced manufacturer who offers compression molding process service, we welcome to look for cooperating for high-quality custom rubber parts.